IBM Cloud, Deploy Python/Flask App to Cloud Foundry in 5 min. We'll guide you to deploy Flask ecommerce app on IBM Cloud Foundry and take you ahead of simple deployment of "Hello World " kind of app
Moreover we'll connect this app to IBM Cloudant database and IBM object storage
Cloud Foundry is open source platform which ensures that develop and deploy aspects of your app remain coordinated.
IBM Cloud Foundry gives us out of box solution for deployment of small web apps.
Getting Ready
Any web out there requires a web hosting, database connection for its static assets and object storage for holding its images.
At the end of this tutorial you'll able to develop functional E-commerce Flask app(Python web frame) with connection of Cloudant database and Object storage.
In this tutorial we'll guide you from development of you flask app locally or clone it from repo,
then run app and modify according to your need, once satisfy with your modification and ready to deploy then we'll move onto next step
deploy this app on IBM Cloud Foundry
then we'll connect Flask app to IBM Cloudant database and IBM Object storage
Prerequisite
You'll need following to start
a. Python
b. IBM Cloud Account (if you are new to it create one it's free and only takes a min or so)
c. Cloud Foundry CLI
d. Git
If you have knowledge how flask and python works it is plus point
Clone Repo or Build Locally
Before you start it's recommended to created virtual environment (see python doc for creating virtual env) and activate it.
You can create Flask app locally as you wish or clone it form the GitHub repo link. After cloning the repo headed into cloned folder.
git clone https://github.com/rehmaniosama/IBM_Cloud_Foundry_Deployment.git
cd foldername
Familiarized yourself with different files in clone folder
Install Requirements and Run Locally
Every application run on it's dependences which is listed in requirements.txt file.
You need to install these dependencies independently or run single command to install these.
It's important to have virtual environment activated so you can install these dependencies in ideally separate environment
so that these can not clash with your operating system or other python dependencies.
pip install -r requirements.txt
This automatically fulfill requirements to run app
once you install all the requirements, run it locally and see what need to be change according to your need
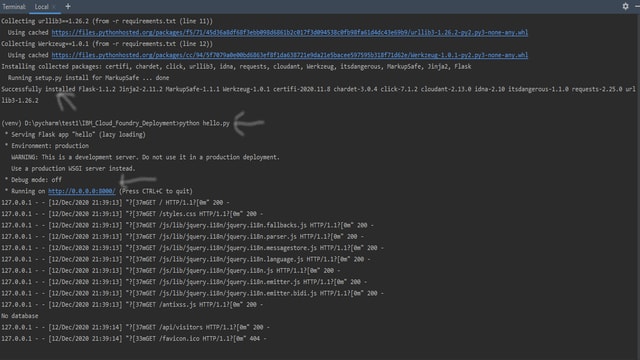
python hello.py
This will start your development server on
localhost:8000
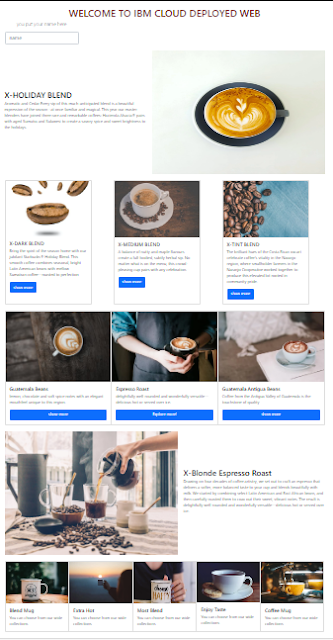
your home page will looks like
Once you will done with modification of code as you needed we wish to continue further to prepare our app for deployment on IBM Cloud Foundry
Configure Flask app for Deployment on IBM Cloud Foundry
You have notice that manifest.yml file in clone folder with some basic configurations regarding your app. This file hold basic info regarding your app such asa. name of your app
b. how much memory you want to allocate for this particular instance
c. you can see in following code we set random-route : True because once you deploy this Flask app on IBM Cloud Foundry.
d. A random domain will be generated for this route so by setting it to True mean we accept that route or if you want host name of your choice you always mention in.
The template is provided in clone file
you should change application name and allocate the memory
applications:
- name: YourApplicationName
random-route: True
memory: 256M
Deploy Flask app on IBM Cloud Foundry
For deploy app onto IBM Cloud Foundry you will need IBM account and Cloud Foundry CLI
first you will need to login into IBM account with following command and choose account if you have multiple
once you login into your account then
you need to target the Cloud Foundry or you can choose cloud foundry api to select API-endpoint
bx login
bx target --cf or cf api (API-endpoint)
bx cf apps
this will list all the running and stopped apps in IBM Cloud Foundry
now its time to deploy our app onto IBM Cloud Foundry with single command
bx cf push
set back and watch this will take a time depending upon your app complexity,
this will take care of all deployment headache and build all the dependencies as listed in requirements.txt file
once this will complete you will see the success message and URL to your live running app and other info
if you didn't see the success message or see Failed , you can traceback by following command
bx cf logs (your_app_name) --recentbx cf apps
this will list all apps including current deployed app.
After deploy this app is now live but have a problem all the data or
user input didn't able to store in database now it's turn to store data in IBM Cloudant database.
Add IBM Cloudant Database
Cloudant Database is NoSQL database
we'll add this database and configure Flask app accordingly so it can run locally and also run on IBM Cloud.
a. For adding Cloudant database you need to login into your IBM account go to the Dashboard, then select you application.
b. once application dashboard is open go onto connections and create new connection
Cloudant Database use
As you see in hello.py file under the VCAP_SERVICES
which is looking for local json file to load to connect database
local json store the service credential to connect Cloudant database
with open('vcap-local.json') as f:
vcap = json.load(f)
print('local VCAP_SERVICES found')
By doing this we're point database when application runs locally
a. let's create vcap-local.json file inside application folder to store service credential
b. below template code will help you how to store service credential inside vcap-local.json
you can change according to your need
c. When application is running on IBM Cloud Foundry it will read service credential from VCAP_SERVICES environment variable.
d. This file only used when application runs locally
From where you get this service credential?
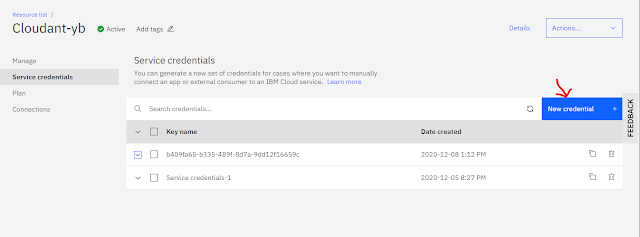
well you go to IBM Cloud account , open your App , click Connections , select Cloudant then View Credentials.
Credentials looks like this
now its time to copy required credential as Cloudant-DB-Username, Cloudant-DB-Password, Cloudant-DB-Host
past these credential in vcap-local.json file and reload the app
Run your local development server by
python hello.py
go to localhost:8000 and add your name, submit it now you will see response coming from data base
you can confirm by going onto Cloudant database where you can see each entry is present
So you can start with IBM Cloud Object Storage and uploading the images in Object Storage Bucket and connect to your Flask app or any other app(this is same process as you create Cloudant DB).
IBM Cloud Object Storages is IBM service where you can create you bucket and upload you images mainly and other static assets into it
a. bucket name is universally unique then mention region
b. after that you link your bucket to running apps by doing the same you did in connecting Cloudant Database
c. first go to connection and create new connection
d. you can drag and drop your data directly into bucket or you can upload.
bx cf push
You can view your deployed app live from any source
https://my-new-app-cheerful-cassowary-wk.mybluemix.net/
Takeaway Conclusion
1. IBM Cloud Foundry and IBM services gives you out of box solution for development, deployment of your website so STOP paying good money to host website
2. IBM Cloud Foundry deployment of functional ecommerce flask app is just a boilerplate to start with and you see how easy it is to develop and deploy app on IBM Cloud Foundry
3. You can use the code and modify it according to your needs
4. This project is just to familiarized with IBM Cloud and it's services
5. This is how you easily Deploy Python/Flask App to Cloud Foundry in 5 min
What to do next?
You can explore IBM Cloud services
You can deploy as kubernetes service
for further check IBM Cloud
NOTE: This article is written by Rehmani Osama
FOLLOW: https://github.com/rehmaniosama/IBM_Cloud_Foundry_Deployment


Comments
Post a Comment